

When choosing a yukata — a lightweight cotton kimono — or a tenugui, a traditional rectangular cotton cloth, you may come across the term “chūsen.” Even once you learn it is “a kind of stencil dyeing,” it can be hard to picture exactly how the cloth is dyed, or what sets it apart from printing and from other stencil methods.
This article sets out, step by step, what chūsen is, how the process brings colour to both sides of yukata and tenugui, and how it differs from kata-yūzen (stencil yūzen) and Tokyo some-komon (fine-stencil dyeing). It also covers what to look at in a chūsen product, and what to check when using the technique for product development or store textiles.
Chūsen is a stencil-resist dyeing technique in which a pattern is formed with a paper stencil and resist paste, dye is poured onto folded layers of cloth and drawn through by suction, and the cloth is then turned over so it is dyed from both the front and the reverse.
What defines chūsen is not only that the dye is poured from above. Accurate stencilling, the folding of the cloth, the paste barrier that channels the dye, suction from below, and dyeing after the cloth is turned over all work together to produce minimal difference in colour between the two sides.
Table of Contents
What is chūsen? A kind of stencil dyeing — but how does it differ?
Chūsen is a technique within stencil dyeing, but it is distinguished by folding the stencilled cloth into layers, pouring dye onto it, and dyeing from both the front and the reverse.
Stencil dyeing (katazome) is a method of forming a design using stencils made from paper, wood or metal. In Japan, the practice developed around laying resist paste through a paper stencil, which controls which areas absorb the dye. Chūsen, too, is a kind of stencil dyeing in the sense that it uses a paper stencil and resist paste.
(Source: Stencil-Dyed Cloth, Fan Design | Cultural Heritage Online)
What is distinctive about chūsen is not the use of a stencil in itself, but that the stencilled cloth is folded into layers, dye is poured and passed through those layers, and the cloth is dyed from both sides. Rather than thinking “chūsen and stencil dyeing are separate techniques,” it is more accurate to see it this way: chūsen sits within the larger category of stencil dyeing.
Where chūsen sits within the stencil dyeing family
Stencil dyeing includes Tokyo some-komon, kata-yūzen, and Ryūkyū bingata, in which paste is laid through a stencil. But even within stencil dyeing, there is more than one way to introduce colour after stencilling.
Depending on the technique and region, colour may be brushed across stretched cloth (hiki-zome), applied as coloured paste (shigoki), introduced by immersion (shinsen), or placed selectively within individual motifs. So stencil dyeing cannot be lumped together as “a technique of brushing colour onto flat cloth.”
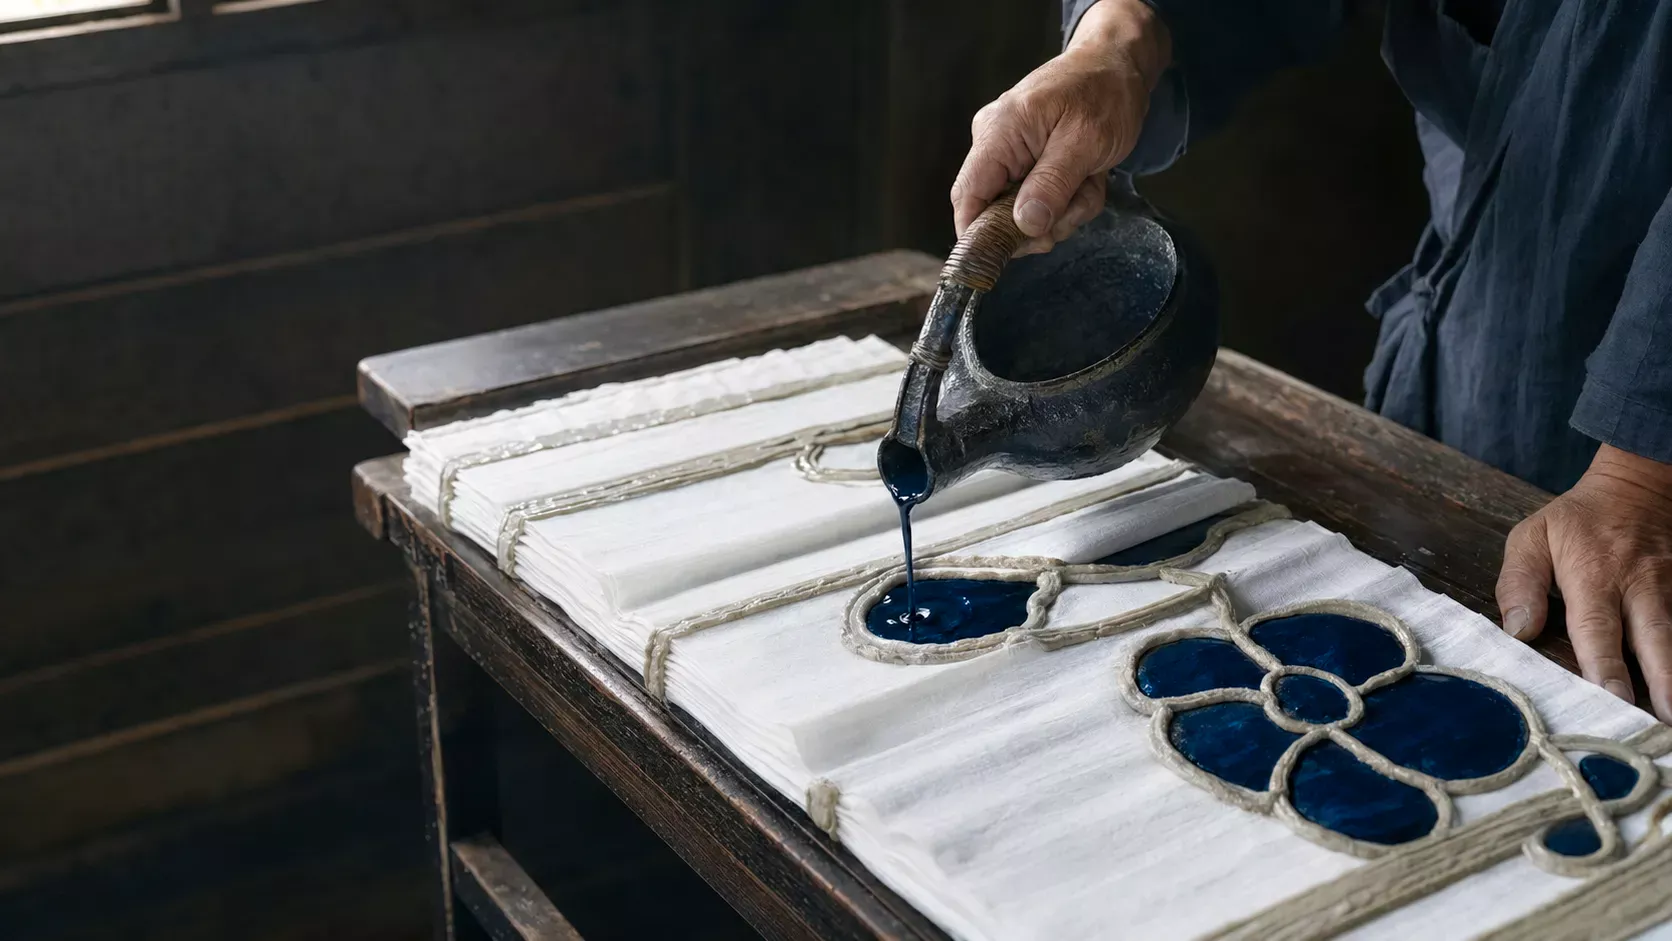
In chūsen, the stencilled cloth is accordion-folded back and forth like a folding screen, and dye is poured from above. In the common process today, dye is drawn down through the layers of cloth by a pump from below, and the cloth is then turned over and dyed from the other side too.
Official information on Tokyo Honzome Chūsen traces the technique’s origins to a method of “pour dyeing” tenugui devised by Edo dyers (kōya) in the late Edo period. The form of chūsen practised today then developed in Osaka in the Meiji era and spread to Tokyo. In Tokyo, from the end of the Meiji era, chūsen was also applied to yukata cloth.
(Source: Tokyo Honzome Chūsen | Traditional Crafts Aoyama Square)
Tokyo Honzome Chūsen and Naniwa Honzome — differences of name and region
“Chūsen” is the general name of the technique. “Tokyo Honzome Chūsen” and “Naniwa Honzome,” on the other hand, are craft names tied to requirements such as a specific production region and particular traditional techniques and raw materials.
Tokyo Honzome Chūsen was designated a Traditional Craft by the Minister of Economy, Trade and Industry on 26 October 2023, under Japan’s Act on the Promotion of Traditional Craft Industries. Its main production areas are Adachi, Katsushika and Edogawa wards in Tokyo, Utsunomiya in Tochigi Prefecture, and Takasaki in Gunma Prefecture.
(Source: “Tokyo Honzome Chūsen” Designated as a Traditional Craft | Kanto Bureau of Economy, Trade and Industry)
Naniwa Honzome was designated a Traditional Craft by the Minister of Economy, Trade and Industry on 20 November 2019. Its main production areas are Sakai and Kashiwara in Osaka Prefecture, and its main products include tenugui and yukata.
(Source: Naniwa Honzome | Traditional Crafts Aoyama Square)
The watering-can-like tool used to pour the dye is called a “yakan” in the official description of Tokyo Honzome Chūsen and a “dohin” in Sakai’s process description. The different names reflect the tool traditions handed down by region and workshop, not any difference in quality or technical value.
Note that not every product made with chūsen automatically becomes Tokyo Honzome Chūsen or Naniwa Honzome. The general technique name and the region-based designated names need to be understood separately.
How does chūsen produce colour on both sides? Breaking down the process
The double-sided quality of chūsen comes from the way stencilling, building the barrier, pouring the dye, suction from below, and dyeing after the cloth is turned over all work together.
Pouring dye from above does not, on its own, dye every layer and both sides to the same depth automatically. What matters is laying resist paste at the same position on each stacked layer, drawing the dye through by suction, and then turning the cloth over to dye it from the other side too.
Stencilling — forming the pattern outline with resist paste
The first main step is “stencilling.” The stencil, stretched on a frame, is lowered onto the cloth, and resist paste is laid evenly with a spatula. Dye does not readily enter where the paste sits, and the pattern appears as the paste-free areas take the dye.
Once one round of stencilling is done, the cloth is folded back at an exact position and the same work is done on the next face. Repeating this creates resist areas at the same position on each folded layer. The official Tokyo Honzome Chūsen process explains that by folding the cloth back exactly at the pasted edge and repeating the stencilling, resist paste is applied equally to both sides of the cloth.
(Source: How Tokyo Honzome Chūsen Is Made | Traditional Crafts Aoyama Square)
An article in which Musashiya visited the Isebo dyeing workshop describes a process using a stencil of about one metre on yukata cloth of about twelve metres, stencilling twelve times per bolt. This is one example of yukata cloth at a particular workshop; the number of times varies with product dimensions and the stencil.
(Source: Tokyo Honzome Yukata: “Chūsen / Stencilling” | Musashiya)
In videos of chūsen, the moment the dye is poured is the visual highlight. But the outline of the pattern and the alignment of the layers depend heavily on the precision of the stencilling and folding done before that.
Creating resist-paste barriers to separate the colours
Where several colours are to be dyed separately, resist paste is piped from a tube to form a raised barrier, called a “dote” (embankment), around the area into which dye will be poured.
The resist paste laid through the stencil mainly serves to create the areas that are not dyed. The dote, on the other hand, is used to keep the poured dye from flowing out into the neighbouring area, dividing the colours.
Sakai’s official process explains that the pasted cloth is placed on the dyeing table, a dote is built with resist paste, and dye is poured inside it with a dohin.
(Source: Naniwa Honzome (Chūsen) and Wazarashi | Sakai City)
The dote is not merely an enclosure that dams the dye. Because it bears on the boundaries between colours, the flow of the dye and the width of gradation, it determines how the design is realised through the movement and separation of the dyes.
Pouring and suction — how the dye passes through the folded cloth
Onto cloth that has been stencilled and given any necessary dote, dye is poured from the watering-can-like tool. In the common process today, dye is drawn down by a pump from beneath the dyeing table, drawing the dye through every layer of the folded cloth.
After the pouring and suction from one side are finished, the whole cloth is turned over and dye is poured from the other side too. Sakai’s official process likewise explains that the dye is drawn down evenly into the cloth by a pump from below, and that the same work is repeated on the reverse.
(Source: The Chūsen Process | Sakai City)
Chūsen is therefore not “a technique in which one pour of dye completes front and back at the same time.” By passing dye through the stacked cloth with suction, and then dyeing from both the front and the reverse, the dye penetrates more thoroughly through the woven structure of the cloth, and the colour difference between the two sides becomes small.
The amount, position and order of the poured dye, and the timing of the suction, all influence the finished result. And because resist paste and the state of the cloth are affected by temperature and humidity, using equipment does not automatically yield the same result every time.
Single-colour, separated-colour and gradation dyeing — variations of the technique
Chūsen has several techniques, according to how the dye is introduced and how colours are combined.
- Single-colour dyeing (ippokuzome): a technique that leaves the pasted areas undyed and dyes the rest in a single colour.
- Separated-colour dyeing (sashiwake-zome): a technique that divides areas with a dote of resist paste and dyes several colours separately at once.
- Gradation dyeing (bokashi): a technique that blends dyes of different colours to create soft transitions in colour boundaries and in light and shade.
- Hosokawa-zome: listed in the official information on Tokyo Honzome Chūsen as a technique that expresses through layered dye.
In the traditional techniques of Tokyo Honzome Chūsen, one or more of “single-colour dyeing,” “separated-colour dyeing,” “gradation dyeing” and “Hosokawa-zome” are used, and dyeing is done from both sides. In separated-colour dyeing, and in part of gradation and Hosokawa dyeing, a dote of resist paste is built for the dyeing.
(Source: The Techniques of Tokyo Honzome Chūsen | Traditional Crafts Aoyama Square)
Chūsen includes steps that use machinery, such as pumps and drying equipment. At the same time, skilled judgement remains essential to the stencilling, the construction of the dote, the way the dye is poured, the suction, and the control of colour boundaries. Rather than locating the value in “not using machines,” it is important to see chūsen as the skill of controlling a whole process that includes tools and equipment.
How does chūsen differ from other stencil-dyeing techniques (kata-yūzen, Tokyo some-komon and the like)?
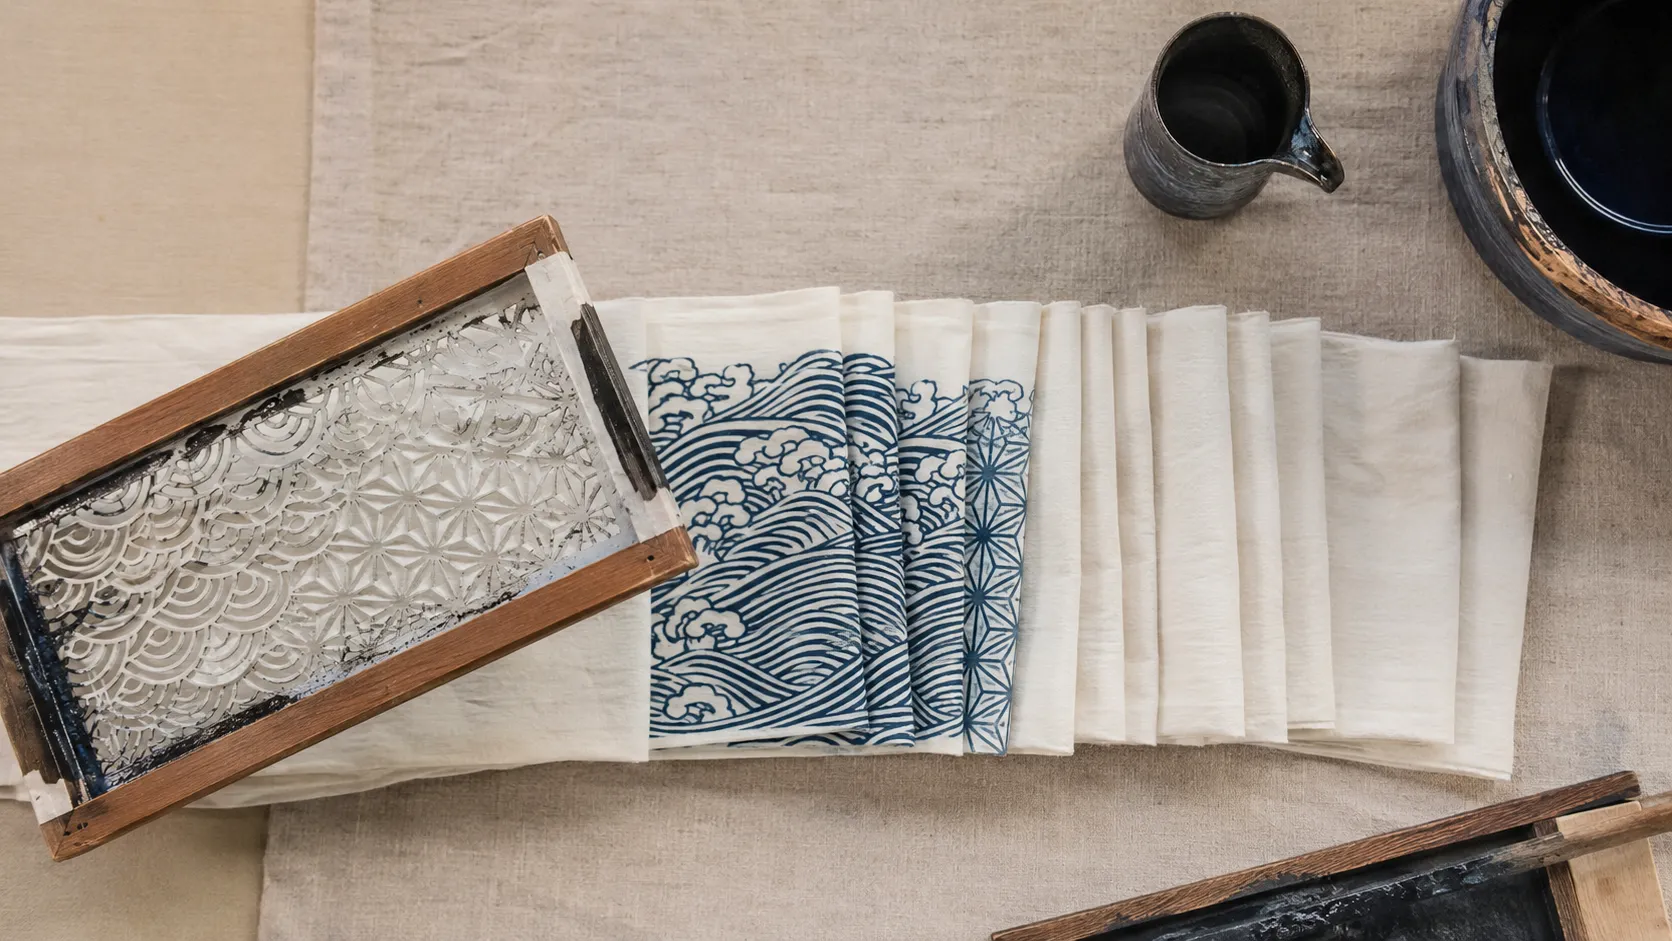
The defining difference is not whether a stencil is used, but how the dye is applied and how the cloth is handled after stencilling.
Kata-yūzen and Tokyo some-komon also use stencils, but their processes are not the same. Nor is there a single method called “ordinary stencil dyeing.” Any comparison has to take the diversity of stencil dyeing as its premise.
Comparison table: how chūsen and other stencil dyeing differ
| Point of comparison | Chūsen | Other stencil-dyeing methods |
|---|---|---|
| Classification | A kind of stencil dyeing | A general term for dyeing that forms a design using stencils |
| Stencil | Uses a paper stencil stretched on a frame | Uses a stencil suited to the technique |
| Resist paste | Used for stencilling and, as needed, for the dote | Use varies: resist paste may define motifs, separate colours or protect undyed areas |
| How colour is introduced | Dye is poured onto folded cloth, drawn through by suction, and dyed from both sides | Varies by technique — brush dyeing, spreading, immersion, selective application, printing, etc. |
| Handling of the cloth | The cloth is folded into layers as it is stencilled | Varies by technique — stretched on a board, held under tension, immersed in dye, etc. |
| How the two sides look | The colour difference between sides tends to be small | Varies by technique and cloth |
| Multi-colour expression | Colours separated by resist-paste barriers, gradation and related effects | Varies by technique — multiple stencils, coloured paste, selective application, etc. |
| Main uses | Tenugui, yukata, dress accessories, cloth goods, etc. | Diverse — kimono cloth, obi, yukata, furoshiki, cloth goods, etc. |
In kata-yūzen, many stencils may be used according to the number of colours, with colour applied by techniques such as rubbing and spray dyeing. The Kyoto Yūzen Cooperative Association divides Kyō-yūzen into four types — hand-drawn dyeing, stencil dyeing, machine printing and digital dyeing — so Kyō-yūzen as a whole is not stencil dyeing.
(Source: An Introduction to Kyō-yūzen Techniques | Kyoto Yūzen Cooperative Association)


In Tokyo some-komon, stencils are used to align the pattern by hand, and the ground is dyed by brush (hiki-zome) or by “shigoki.” In explaining the difference from chūsen, rather than simplifying it to “Tokyo some-komon simply applies colour to one side with a brush,” the differences in process need to be looked at individually.
(Source: About Tokyo Some-komon | The Comprehensive Site for Japanese Traditional Crafts)

Editor’s note — why “a kind of stencil dyeing” is not the place to stop
In explaining chūsen, the answer “it is a kind of stencil dyeing” alone does not convey the difference readers really want to know.
What matters in understanding chūsen is not to isolate the moment the dye is poured. The precision of the finished result rests on the stencilling and folding done beforehand, and the double-sided quality rests not only on the suction but on the dyeing after the cloth is turned over.
Chūsen does not treat a single flat sheet of cloth on its own; it passes dye through several folded layers. In that sense, it is better understood as a process that sends dye through the layered structure of folded cloth, rather than merely applying a pattern to its surface.
The value of craft cannot be reduced to a single photogenic moment. By looking beyond it to the preparation and repetition that become hard to see once a piece is finished, the value of the technique — and the technical judgement required of the dyer — comes into view.
How to recognise a chūsen product: points for choosing yukata and tenugui
Colour on both sides is a clue to recognising chūsen, but the technique cannot be determined by appearance alone. Check the maker, workshop, region and product labelling as well.
Because chūsen dyes from both sides, the colour difference between front and back is generally small. But chūsen is not the only dyeing method in which colour enters through to the reverse. And with printing too, penetration to the reverse varies with the cloth, the colourant and the finishing method.
Checklist: five angles for confirming chūsen
- Colour on both sides: turn it over and check how the pattern and colour look compared with the front. But do not determine the technique from this alone.
- Pattern outline: observe the areas left undyed by the resist paste, the boundaries of the pattern, and how the dye has entered.
- Gradation and colour transition: in gradation dyeing, look at how colour transitions within the cloth.
- Material and care labelling: check the material, such as cotton or cotton-linen, the washing method, and cautions about colour transfer.
- Production information: check whether the dyeing technique, workshop, maker and region name are shown.
Wavering outlines and piece-to-piece variation are also worth noting, but you cannot judge “uneven, therefore handwork” or “even, therefore machine.” Skilled handwork can have high uniformity, and printing can deliberately reproduce soft edges, irregularity and apparent dye bleed.
The same holds for price. Price is affected by the pattern, the number of colours, dimensions, cloth, order quantity, finishing, distribution route and more. You cannot judge “expensive, therefore chūsen” or “cheap, therefore another technique.”
The difference from printed (screen-printed) tenugui
Screen printing is a method of applying colorant to cloth through a screen. It can use either pigments or dyes, and penetration to the reverse and the feel of the fabric vary with the colourant, the cloth and the processing conditions.
Chūsen, on the other hand, folds into layers the cloth on which resist paste has been laid through a stencil, pours dye, and dyes from both sides. The difference between the two is not simply “to the front, or through to the back,” but lies in the way colour is introduced into the fabric.
Printing can suit fine patterns, strict colour management, near-photographic expression and mass production. Chūsen suits projects that make use of its double-sided quality, the penetration of the dye, gradation, and the soft character of the cloth. Rather than ranking one method as better across the board, the appropriate method depends on the intended use and visual effect.
Commercial uses of chūsen — product development, store textiles and workshop collaboration
Chūsen can be applied not only to tenugui and yukata but to store textiles, corporate gifts, dress accessories and regional PR.
That said, rather than treating the use of a traditional technique as added value in itself, it is important to consider whether chūsen’s double-sided quality, gradation and penetration into cloth are actually needed for the product or space being planned.
What to check when considering chūsen for product development or OEM
In product development with chūsen, rather than handing a finished design straight to a workshop, it is advisable to consult the workshop on how the design can be adapted to the process before it is finalised.
- The product’s use
- Finished size and cloth width
- Preferred fabric and fibre composition
- Motif scale and repeat structure
- Required colours and total number of colours
- Whether gradation or separated colour is wanted
- Desired quantity
- Required delivery date or lead time
- Budget
- Whether cutting, sewing and packaging are needed
- Care, composition and quality labelling requirements
- Credit requirements for the workshop, maker and production region
- Permissions for photographing, filming and publishing the production process
- The scope of domestic and overseas sales
Fine lines, wide white areas, many colours, adjacent colours and strict colour specification all affect the stencilling, the dote and the flow of the dye. Because the workable specifications, quantity, delivery time and price differ by workshop, do not judge from general guidance alone; share the intended use and proposed design with the workshop, then confirm the feasible specifications, minimum quantity, lead time and price.
For use in retail and hospitality spaces, beyond the design, you also need to check the method of installation, how the piece looks when light passes through it, the frequency of washing and replacement, durability, and flame-retardant performance where required.
A point of contact for collaboration with workshops and regions
Kogei Japonica can help organise project content — from a stage where the use or design is not yet fixed — for chūsen yukata and tenugui product planning, store textiles, corporate gifts, regional PR and collaborations with workshops.
Rather than treating a workshop as a mere manufacturing subcontractor, it is important to design the work as a collaboration that includes technical supervision, prototyping, quality standards, credit and conditions for photographing the process.
For those considering product development, store textiles or corporate gifts using chūsen
Please share whatever information is currently available — the intended use, preferred size, quantity, delivery schedule, and whether a design has already been prepared. We will help structure the brief around the character of the technique.
Frequently asked questions (FAQ)
A concise summary of the key points on the relationship between chūsen and stencil dyeing, its double-sided quality, the difference from printing, regions, purchasing and price.
- Q1. What is the difference between chūsen and stencil dyeing?
- Chūsen is a kind of stencil dyeing. It is distinguished by folding the stencilled cloth into layers, pouring dye over it, and dyeing it from both sides.
- Q2. Why are yukata and tenugui dyed through to the reverse?
- Because dye is poured onto folded cloth and drawn down by suction, and the cloth is then turned over and dyed from the other side. Stencilling, suction and dyeing after the turn work together to produce the double-sided quality.
- Q3. If it is dyed through to the reverse, is it necessarily chūsen?
- Not necessarily. Colour on both sides is one clue, but rather than determining it from appearance alone, check the maker, workshop, region and product labelling.
- Q4. What is the difference between chūsen and screen-printed tenugui?
- The way colour is introduced into the cloth differs. Chūsen pours dye onto cloth on which resist paste has been applied through a stencil, and dyes from both sides. Screen printing applies pigment or dye to the cloth through a screen.
- Q5. What is the difference between Tokyo Honzome Chūsen and Naniwa Honzome?
- Both are nationally designated Traditional Crafts that use chūsen, but they differ in designated name, main production regions, historical background, and requirements for technique and raw materials. Tool names also vary by region.
- Q6. Where can I buy chūsen yukata and tenugui?
- At workshop shops in the production regions, official online stores, and specialist craft retailers. Because the range and stock change, check each workshop’s or store’s official information.
- Q7. Does chūsen fade or transfer colour?
- It varies with the dye, the cloth, the post-dyeing treatment and how it is used. Follow the maker’s or seller’s care labelling, including the first washing method and cautions about colour transfer.
- Q8. Why is there such a range in the price of chūsen products?
- Because the cloth, pattern, number of colours, whether separated colour or gradation is used, dimensions, sewing, order quantity and distribution route all differ. You cannot judge the dyeing technique or quality by price alone.
- Q9. Can I make an original product with chūsen?
- You can, but the workable cloth, pattern, number of colours, quantity and delivery time differ by workshop. It is best to discuss the use and specifications before finalising the design.
Summary — how to approach chūsen as a technique
Describing chūsen simply as “a kind of stencil dyeing” does not fully explain how the technique works. Resist paste is laid through a paper stencil, the cloth is folded into layers exactly, a dote is built where needed, and dye is poured and drawn through by suction. The cloth is then turned over and dyed from the other side, producing a result with little difference in colour between the two sides.
The difference between chūsen and other stencil dyeing is not whether a stencil is used. It lies in how the cloth is handled after stencilling, and how the dye is passed through it.
Colour visible on both sides, together with characteristic gradation or dye bleed, can offer clues to recognising chūsen, but appearance alone cannot confirm the dyeing method. It is important to check the maker, workshop, region and product labelling, and to choose a product suited to the use.
The value of craft cannot be reduced to a single showy moment of pouring the dye. By looking beyond it to the stencilling, folding, dote, washing and drying — which become hard to see once a piece is finished — the process and the accumulated judgement that support chūsen come into view.
Choosing a yukata or tenugui with that mechanism understood can be a first step toward engaging with the material, the technique and the maker’s work, rather than treating craft merely as a decorative symbol of Japan.


